At a glance
- The outermost layer of the human tooth is enamel, a highly mineralised, acellular crystalline tissue composed predominantly of hydroxyapatite.
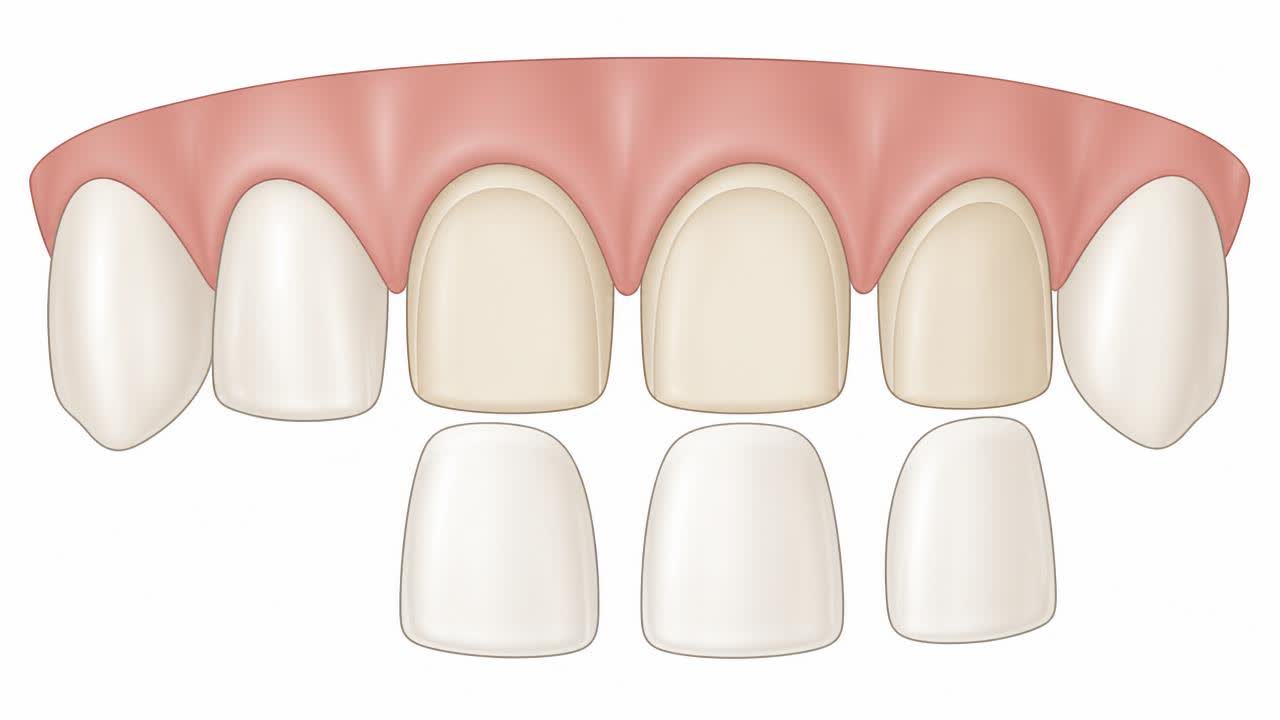
- Patients frequently ask why tooth reduction is required at all when placing veneers.
- A central question for prospective patients is precisely how much enamel is shaved or removed for dental veneers.
- Careful clinical diagnosis precedes any irreversible enamel reduction.
- Veneer preparations are categorised based on incisal margin architecture and anatomical coverage.
Dental Anatomy and the Biology of Enamel Reduction
The outermost layer of the human tooth is enamel, a highly mineralised, acellular crystalline tissue composed predominantly of hydroxyapatite. Enamel possesses no living cells and cannot regenerate once lost. Beneath this rigid exterior lies dentine, a softer, vital, and tubular collagenous structure that directly communicates with the dental pulp—the central neurovascular tissue containing nerves and blood vessels. When discussing cosmetic and restorative treatments, the biological interface between enamel and dentine is of paramount clinical importance. Preserving enamel is the single most critical factor in guaranteeing long-term bond strength and preventing post-operative pulpal complications.
Tooth preparation for indirect restorations, such as porcelain or composite veneers, necessitates the selective reduction of this outer crystalline shell. Understanding how much enamel is removed for veneers requires an appreciation of anatomical variation: enamel thickness is not uniform across the tooth surface. At the cervical third, near the gingival margin (gum line), enamel can be as thin as 0.3 to 0.4 millimetres, whereas at the middle third it averages 0.8 to 1.0 millimetre, and at the incisal edge it may exceed 1.5 millimetres. Removing too much enamel risks exposing the underlying dentine, which compromises adhesive predictability, elevates the risk of microleakage, and increases tooth sensitivity.
The biological objective during any preparatory procedure is to remain strictly within the enamel substrate whenever possible. When restorative margins are bonded directly to etched enamel, the micromechanical bond created by resin cements is exceptionally strong, durable, and resistant to bacterial ingress. Conversely, bonding to dentine relies on a hybrid layer formed within dentinal tubules, which is inherently more susceptible to hydrolytic degradation and secondary microleakage over time. Therefore, modern minimally invasive dentistry prioritises maximum tissue preservation, ensuring the tooth retains structural rigidity while creating sufficient clearance for aesthetic ceramic materials.
Diagnostic Assessment, Digital Planning, and Case Selection
Careful clinical diagnosis precedes any irreversible enamel reduction. The clinician performs a comprehensive examination assessing tooth vitality, periodontal health, occlusal relationships, and dynamic jaw movements. Digital periapical radiographs or orthopantomograms are essential to verify that roots are healthy, without periapical radiolucency, bone loss, or occult interproximal decay. In complex aesthetic rehabilitations, high-resolution Cone Beam Computed Tomography (CBCT) or intraoral optical scans are integrated to evaluate three-dimensional alveolar architecture and enamel thickness accurately.
Diagnostic wax-ups and intraoral mock-ups represent the modern standard of care to prevent excessive enamel removal. Using digital smile design (DSD) software or physical stone models, the laboratory creates a blueprint of the proposed tooth form. This design is transferred directly into the patient's mouth using a temporary bis-acryl resin matrix (an intraoral mock-up). The clinician then prepares the teeth *through* this mock-up using calibrated depth-cutting burs. This technique ensures that enamel is reduced solely where necessary relative to the final planned contour, rather than arbitrarily cutting natural tooth structure, thus sparing vast amounts of healthy tissue.
Case selection also accounts for systemic, functional, and lifestyle factors. Patients with active parafunctional habits, such as severe sleep bruxism or clenching, require careful occlusal analysis and a mandatory protective nightguard post-treatment to avoid ceramic fracture. In regions where the consumption of paan, gutka, areca nut, or highly chromogenic tobacco products is prevalent, clinicians must evaluate the baseline tooth wear, extensive intrinsic staining, and compromised periodontal support. Active periodontal disease, untreated caries, and severe crowding are absolute contraindications that must be fully resolved before veneer preparation can be considered.
The Biomechanical Rationale: Why Enamel Preparation Is Necessary
Patients frequently ask why tooth reduction is required at all when placing veneers. The primary objective is to create adequate physical space for the restorative material without altering the natural emergence profile—the angle at which the tooth emerges from the gingiva. If a clinician places a veneer directly over an unprepared tooth without selective reduction, the resulting restoration will inevitably be overcontoured. Overcontoured margins create plaque-retentive ledges that irritate the surrounding periodontal tissues, triggering chronic gingivitis, pocketing, bleeding, and eventual bone loss around the treated teeth.
A second rationale involves path of insertion and aesthetic masking. Teeth that are malaligned, rotated, severely discoloured, or disproportionate require physical recontouring to establish a harmonious arch form. In cases of deep intrinsic staining—such as tetracycline banding, severe fluorosis, or chromatic changes from habitual betel nut or gutka use—a specific minimum thickness of restorative ceramic (typically 0.5 millimetres or more) is mandatory to visually mask the dark underlying shade. Without adequate preparation depth, the underlying grey or dark yellow substrate shines through the translucent porcelain, leading to an unnatural, chalky, or poorly matched aesthetic outcome.
Finally, definitive enamel preparation creates a distinct, defined finishing line, such as a chamfer or rounded shoulder margin. This margin guides the dental laboratory technician in fabricating a veneer with exact borders, facilitating seamless seating during cementation. A well-defined margin ensures the junction between porcelain and natural tooth structure is flush, smooth, and easily cleansable with standard interdental brushes and floss, thereby preventing plaque stagnation, marginal discoloration, and secondary dental caries along the restoration perimeter.
How Much Enamel Removed for Veneers: Depths and Variations
A central question for prospective patients is precisely how much enamel is shaved or removed for dental veneers. In contemporary minimally invasive protocols, facial (front surface) enamel reduction generally ranges between 0.3 and 0.7 millimetres. In the delicate cervical region near the gumline, clinicians aim for a conservative reduction of 0.3 to 0.4 millimetres. Across the middle and incisal thirds of the facial surface, reduction typically measures between 0.5 and 0.7 millimetres. If the incisal edge requires modification or lengthening, 1.0 to 1.5 millimetres of incisal clearance is prepared to provide sufficient structural strength to the ceramic under occlusal biting loads.
These dimensions fluctuate significantly depending on the clinical classification of the preparation: ultra-thin or 'no-prep' veneers, minimal-preparation veneers, and conventional preparation veneers. No-prep or prep-less designs require either zero enamel removal or merely microscopic enamel recontouring (0.1 to 0.2 millimetres) to smooth sharp line angles; however, they are only suitable for selected cases where teeth are small, retroclined, or have spacing. Minimal-preparation veneers adhere to the standard 0.3 to 0.5 millimetre range, whereas conventional preparations—often necessitated by severe malposition, heavy discolouration, or old composite restorations—may approach 0.7 to 1.0 millimetre in targeted zones.
The table below outlines the standard reduction depths across anatomical zones and clinical approaches:
Cervical Margin: 0.3 to 0.4 mm (Preserves delicate cervical enamel ring) Mid-Facial Zone: 0.5 to 0.7 mm (Provides optimal thickness for aesthetic ceramic layering) Incisal Edge Reduction: 1.0 to 1.5 mm (Ensures structural resistance to shearing bite forces) Interproximal Extension: 0.5 mm (Extends slightly into contact areas to hide aesthetic margins) No-Prep / Minimal-Prep Variations: 0.0 to 0.3 mm (Reserved for microdontia, lingually displaced teeth, or diastema closure).
Preparation Designs, Geometries, and Material Selection
Veneer preparations are categorised based on incisal margin architecture and anatomical coverage. The four primary incisal configurations include the window (intra-enamel) preparation, the feather-edge preparation, the butt-joint margin, and the incisal overlap (palatal chamfer) design. The butt-joint and incisal overlap designs are most widely used in modern clinical practice because they provide structural ceramic volume to withstand vertical chewing forces, facilitate precise seating during cementation, and allow the ceramist to build lifelike, translucent incisal halos.
Preparation depth is directly influenced by the restorative material selected. Ultra-translucent materials, such as feldspathic porcelain, can be fabricated in ultra-thin dimensions of 0.2 to 0.3 millimetres, demanding minimal tooth modification. However, feldspathic porcelain has lower flexural strength and relies entirely on adhesive bonding to rigid underlying enamel. In contrast, pressable or CAD/CAM-milled lithium disilicate glass-ceramics offer significantly higher flexural strength (approaching 360 to 500 MPa) and require a standard reduction of 0.4 to 0.8 millimetres, making them versatile for masking darker underlying tooth structure and resisting functional stresses.
Direct composite resin veneers represent a less invasive alternative where the resin is sculpted directly onto minimally prepared or unprepared enamel. While composite restorations require less upfront enamel reduction and are easily repairable, they exhibit lower mechanical wear resistance, are susceptible to surface staining over time from dietary chromogens (such as tea, coffee, and turmeric), and lack the long-term optical stability and longevity of sintered glass-ceramics.
The Clinical Preparation Appointment: Step-by-Step
The veneer preparation appointment follows a meticulous, staged clinical protocol. Local anaesthesia is typically administered to ensure patient comfort, especially when managing gingival margins. After placing an intraoral mock-up, the clinician employs calibrated depth-limiting diamond burs. These specialised rotary instruments feature preset cut depths (e.g., 0.3 mm, 0.5 mm) that score horizontal orientation grooves across the labial surface. The clinician then removes the remaining islands of enamel between these depth grooves, ensuring a completely uniform reduction that prevents unintended over-preparation.
Next, the margins are refined using fine-grit finishing burs to create a continuous, smooth, rounded chamfer finish line positioned supragingivally (above the gum) or equigingivally (flush with the gum). If substantial tooth discolouration must be masked, margins may be extended slightly subgingivally (0.2 to 0.3 millimetres into the gingival sulcus). Non-impregnated or astringent-soaked gingival retraction cords are carefully placed into the sulcus to gently deflect the soft tissue. This exposes the finish lines clearly for digital intraoral optical scanning or high-precision elastomeric impressions using polyvinyl siloxane (PVS).
Following impression capture and precise baseline shade mapping—often documented with polarised clinical photography—interim (provisional) veneers are fabricated. Using a spot-etching technique or temporary luting resin, provisional acrylic restorations are bonded to protect the cut enamel prisms, shield exposed dentinal tubules from thermal stimuli, maintain aesthetics, and prevent the prepared teeth from drifting or over-erupting while the definitive restorations are crafted in the dental laboratory.
Potential Complications, Dentine Exposure, and Management
The most critical biological complication of veneer preparation is unintentional, excessive dentine exposure. Dentine contains thousands of fluid-filled microscopic tubules leading directly to the pulp. When more than 50% of the preparation surface consists of dentine, long-term adhesive bond strength drops substantially, increasing the clinical failure rate due to debonding. To counteract this, skilled clinicians perform Immediate Dentine Sealing (IDS)—applying a dentine bonding agent to freshly cut dentine immediately after preparation—which significantly improves microtensile bond strength and reduces post-operative sensitivity.
Pulpal irritation, ranging from reversible to irreversible pulpitis, is an uncommon but recognised risk of tooth reduction. Friction heat generated during rotary instrumentation, chemical irritation from acidic etching gels, or bacterial invasion through patent dentinal tubules can inflame the pulp. While most pulpal responses resolve once the definitive restoration is hermetically sealed with resin cement, a small percentage of heavily prepared or previously traumatised teeth may undergo pulpal necrosis, eventually requiring root canal treatment (endodontic therapy).
Biomechanical and aesthetic complications include veneer chipping, ceramic fracture, marginal microleakage, and secondary caries. Microleakage occurs when the resin-cement seal breaks down over time, allowing oral fluids and bacteria to penetrate the interface. This manifests clinically as a thin brown or black line along the margin of the veneer. Managing these complications ranges from minor intraoral ceramic polishing or composite edge repairs to complete restoration removal, margin re-preparation, and refabrication of the veneer.
Evidence and further reading
Contemporary prosthodontic and restorative guidelines uniformly advocate for minimally invasive tooth preparation protocols that prioritise enamel preservation. Professional consensus from organisations such as the FDI World Dental Federation, the American Dental Association (ADA), and the British Dental Association highlights that restorations bonded entirely to enamel display significantly higher survival rates and lower incidence of biological complications compared to those bonded extensively to dentine.
Systematic reviews published in international peer-reviewed literature, including the *Journal of Dentistry*, the *Journal of Prosthetic Dentistry*, and *Cochrane Systematic Reviews*, demonstrate that porcelain veneers have an estimated 10-year survival rate exceeding 90% to 95% when standard biological principles are observed. The evidence consistently indicates that exceeding recommended reduction depths (over-preparation) markedly elevates the risk of postoperative hypersensitivity, restoration debonding, and endodontic intervention. Diagnostic mock-ups, depth-limiting preparation burs, and strict adherence to adhesive protocols remain the gold standard in modern aesthetic dentistry.
Post-Preparation Recovery, Normal Sensations, and Aftercare
Following the tooth preparation visit, patients should anticipate a short period of adaptation. Mild, transient dentinal hypersensitivity to cold, hot, or sweet foodstuffs is a common, normal physiological response, particularly if microscopic areas of dentine were unroofed during enamel shaping. Mild tenderness in the adjacent gingival tissue is also normal for two to five days, resulting from the mechanical retraction cords used during margin recording. These symptoms are typically mild and managed effectively with over-the-counter analgesics such as paracetamol or ibuprofen.
Care for provisional veneers requires conscious dietary and oral hygiene modifications. Because provisional veneers are joined together in splinted units and temporarily tacked with weak resin, patients must avoid biting directly into hard, crunchy, or sticky foods (such as crusty bread, raw carrots, hard candies, or chewing gum). Gentle brushing with an ultra-soft toothbrush and using specialised floss threaders or water flossers around provisional margins is vital to keep the gingiva healthy, uninflamed, and free of plaque before final cementation.
Certain symptoms during this interim stage are considered abnormal and warrant prompt clinical attention. Severe, throbbing, spontaneous pain, pain that disturbs sleep, or sharp discomfort when releasing bite pressure indicates possible pulpal inflammation or an elevated bite contact (occlusal prematurity). Furthermore, if a provisional veneer becomes loose, debonds, or fractures, the patient must contact the clinic immediately. Leaving prepared enamel exposed to the oral environment risks bacterial contamination, increased hypersensitivity, and minor tooth movement that can compromise the seating of the final restorations.
Long-Term Maintenance, Habit Modification, and Prevention
The clinical longevity of porcelain veneers depends heavily on patient compliance and meticulous oral maintenance. Veneers are not impervious to failure; while the ceramic material itself cannot decay, the natural tooth margins supporting the restoration remain vulnerable to plaque-induced dental caries. Patients must maintain exemplary oral hygiene, including twice-daily brushing with a low-abrasive, fluoride-containing toothpaste (RDA score below 70) and daily interproximal cleaning using dental floss or interdental brushes. Highly abrasive whitening toothpastes containing silica or charcoal must be strictly avoided, as they scratch ceramic glazes and roughen resin cement lines.
Lifestyle habits directly impact restorative outcomes. The use of areca nut, betel quid (paan), and smokeless tobacco (gutka) is particularly destructive to dental restorations. These substances cause rapid abrasive wear on opposing natural dentition, induce micro-fractures in ceramic margins, and severely stain the resin-tooth interface. Furthermore, patients with a history of bruxism must wear a custom-fabricated, hard acrylic occlusal splint (nightguard) every night to distribute sleep-related clenching forces evenly and protect the delicate ceramic margins from catastrophic shearing fractures.
Routine preventive care requires attending professional dental check-ups and dental hygiene appointments every six months. Clinicians evaluate the integrity of the margins, assess periodontal health, and use specialised non-abrasive polishing pastes (such as fine aluminium oxide paste) to maintain porcelain lustre without stripping away resin margins. Ultrasonic scaling tips must never be placed directly against the margins of veneers, as the high-frequency metal vibration can chip ceramic edges or shatter the adhesive resin bond.
When to Seek Urgent Clinical Attention: Red Flags
While routine veneer treatment proceeds without severe incident, patients must recognise specific clinical red flags that necessitate urgent dental evaluation. Persistent, severe, spontaneous dental pain that throbs continuously or worsens when lying flat indicates advanced pulpal inflammation (irreversible pulpitis) that will not resolve spontaneously. Additionally, localised swelling in the gum adjacent to a prepared or veneered tooth, the appearance of a discharging fistula (gum boil), or facial swelling are signs of active infection requiring immediate diagnostic testing and intervention.
Mechanical emergencies also require prompt professional evaluation. If a veneer chips, debonds entirely, or feels loose, the patient should avoid attempting to re-cement the piece with household adhesives, which can cause permanent damage to the tooth structure and toxicity to oral tissues. The detached restoration should be stored safely in a clean container and brought to the dental surgery. Chewing on that side of the mouth must cease immediately to prevent fracturing the fragile, unsupported natural tooth underneath.
Finally, any persistent alteration in your bite—where one tooth contacts before all others when closing—must be corrected without delay. Occlusal prematurity places enormous, concentrated mechanical loads on a single restoration, rapidly leading to ceramic fracture, acute periodontal ligament inflammation, or severe bite-related pain. Contact your dental team promptly if your bite feels uneven following the placement of provisionals or definitive veneers.
Questions patients ask us
- How much enamel is removed for veneers on average?
- On average, a dentist removes between 0.3 and 0.7 millimetres of superficial enamel from the front surface of the tooth. In the delicate cervical region near the gumline, reduction is minimal (around 0.3 mm), while the incisal biting edge may be reduced by 1.0 to 1.5 mm to allow sufficient structural thickness for the ceramic material.
- Do veneers ruin your natural teeth forever?
- Tooth preparation for traditional veneers is an irreversible process because enamel cannot regenerate once removed. However, when performed conservatively within enamel by a skilled clinician, the structural integrity of the tooth is preserved. The tooth will always require a restoration (a veneer or crown) to remain protected, functional, and aesthetically sound.
- Does the enamel removal process hurt?
- The preparation procedure is typically painless because local anaesthesia is administered to completely numb the treated teeth and surrounding gingival tissues. After the numbness subsides, patients may experience mild, transient sensitivity to temperature changes or minor gum soreness for a few days, which is easily managed with standard over-the-counter pain relievers.
- What happens if a dentist removes too much enamel?
- Removing excessive enamel exposes the softer, tubular dentine layer beneath. This reduces the adhesive bond strength of the veneer, increases the long-term risk of debonding or microleakage, and elevates the likelihood of post-operative tooth sensitivity or pulpal inflammation, which in severe instances may necessitate root canal treatment.
- Can I get veneers without any enamel removal?
- Yes, 'no-prep' or ultra-thin veneers require minimal to no enamel reduction (0.0 to 0.2 mm). However, they are only suitable for specific clinical situations, such as small teeth (microdontia), teeth tilted inward, or closing small gaps. Placing no-prep veneers on normally proportioned or forward-positioned teeth can make them look bulky and create plaque-retaining ledges.
- Will my teeth be sensitive while wearing temporary veneers?
- Mild temperature sensitivity to cold drinks or air is normal while wearing provisional veneers, as the temporary material does not seal the tooth as tightly as final bonded porcelain. If you experience sharp, throbbing pain, or pain when chewing, your dentist should evaluate the provisional restoration to adjust the bite or check the seal.
- How does paan, gutka, or smoking affect tooth preparation and veneers?
- Habits like chewing paan, gutka, or betel nut cause severe abrasive tooth wear, compromise gum health, and create heavy intrinsic staining that requires deeper preparation to mask. Furthermore, these substances severely stain the resin margins of completed veneers and can cause premature ceramic chipping, significantly reducing the lifespan of the restorations.
- How long do veneers last once enamel has been prepared?
- Clinical studies show that porcelain veneers bonded to enamel have a survival rate exceeding 90% to 95% at 10 to 15 years. Longevity depends on maintaining excellent oral hygiene, avoiding abrasive toothpastes, attending routine professional cleans, treating teeth grinding with a nightguard, and avoiding biting hard non-food objects.
Sources and further reading
Guidance from professional and public health bodies. Clinical decisions here are made on your own examination and radiographs.
- 1.Whitening, bonding and veneers — patient information — American Dental Association
- 2.Guidance on tooth whitening and cosmetic dental treatment — British Dental Association
- 3.Oral health — fact sheet and global status report — World Health Organization
- 4.Policy statements and oral health definitions — FDI World Dental Federation
- 5.Dental health — conditions, treatments and patient guidance — NHS (UK)
- 6.Systematic reviews of oral and dental interventions — Cochrane Oral Health
- 7.Regulatory framework and dental education standards in India — Dental Council of India
When to see us
Get examined without waiting if any of the following applies to you:
- Sensitivity or pain that continues for more than a few days after cosmetic work
- A veneer, crown or bonded restoration that has chipped, debonded or feels high in the bite
- Gum inflammation or dark margins developing at the edge of a restoration
Get a written plan and cost before you commit
If this is what you are dealing with, the next step is a consultation with radiographs — cosmetic & smile design cases are seen by the specialist who handles that field. You get a written plan and staged cost before anything begins.
reception@dramitsharmahospital.comThis article is general education and does not replace an in-person examination, radiographs or a diagnosis by a qualified dentist.
Clinical terms in this article
Related in Cosmetic & Smile Design
Dental Crowns and Bridges: What They Are and When You Need One
How crowns and bridges restore damaged or missing teeth, the materials used, and what the process and aftercare involve.
Teeth Whitening and Tooth Stains: Causes and Treatment Options
Why teeth discolour over time, the difference between surface stains and deeper discolouration, and how professional whitening compares with home options.
Smile Makeover and Digital Smile Design
How veneers, bonding, whitening and gum contouring are combined into one planned cosmetic outcome.
Teeth Whitening: What Actually Works
In-office versus home whitening, realistic expectations, sensitivity management and what whitening cannot fix.
Black Triangles Between Teeth Causes and Treatment
Open gingival embrasures, commonly called black triangles between teeth and gums, occur when the interdental papilla recedes. Explore the anatomical causes, clinical classifications, restorative and orthodontic treatments, and long-term periodontal maintenance strategies.
Internal Tooth Bleaching for Discolored Nonvital Teeth
Internal tooth bleaching after root canal treatment is a conservative endodontic procedure that lightens intrinsically discoloured, non-vital teeth from within the pulp chamber, restoring natural aesthetics without requiring extensive structural removal for crowns or veneers.