At a glance
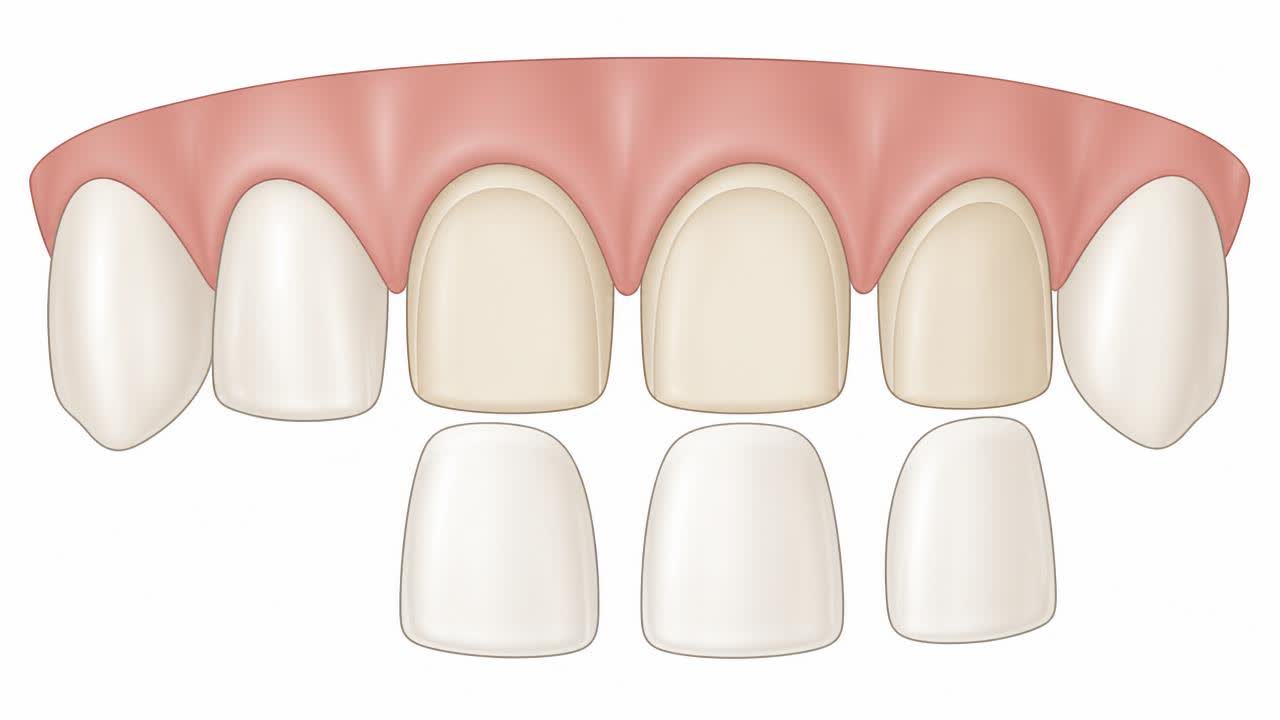
- A porcelain veneer is a custom-fabricated, ultra-thin ceramic restoration bonded to the facial surface of a prepared tooth to modify its colour, shape, or alignment.
- A harmonious smile cannot be designed in isolation from the patient's surrounding facial framework.
- Accurate shade analysis requires rigorous clinical diagnostics performed under controlled conditions.
- In restorative dentistry, colour is broken down using the Munsell colour order system into three distinct coordinates: hue, value, and chroma.
- A critical determinant of final veneer aesthetics is the colour of the underlying natural tooth, termed the preparation or substrate shade (often recorded using the VITA ND natural die shade guide).
Dental Anatomy, Optical Dynamics, and Porcelain Veneers
A porcelain veneer is a custom-fabricated, ultra-thin ceramic restoration bonded to the facial surface of a prepared tooth to modify its colour, shape, or alignment. Achieving a natural result relies on understanding the microscopic architecture of natural teeth. Enamel, the highly mineralised outer shell, is largely translucent and exhibits light-scattering effects such as opalescence and fluorescence. Dentine, the softer inner layer, contains natural pigments that determine the primary tooth shade. When dental surgeons and prosthodontists evaluate how to choose veneer tooth shade, they assess how incident light traverses the glass-ceramic, reflects off the underlying cement layer, and interacts with the prepared natural tooth structure.
Natural dentition exhibits subtle optical gradients rather than uniform colouration. The cervical third (near the gum line) typically displays higher saturation, known clinically as chroma, due to thinner overlying enamel exposing rich dentinal hues. The incisal third (the biting edge) consists almost entirely of translucent enamel, producing characteristic bluish or greyish incisal halos under natural illumination. A primary goal in aesthetic dentistry is replicating these complex multi-layered optical properties. Failing to account for optical depth produces restorations that appear opaque, chalky, or artificial, irrespective of whether the baseline shade matches the patient's cosmetic expectations.
Ceramic biomaterials, including lithium disilicate, feldspathic porcelain, and translucent zirconia, replicate these optical dimensions through varied internal crystalline matrices. Feldspathic porcelain offers superior micro-layering capabilities and natural translucency, making it ideal for minimally invasive preparations over non-discoloured teeth. In contrast, high-strength pressable ceramics provide controllable opacity to mask underlying tetracycline staining or severe dentinal dyschromia. Matching a porcelain shade involves evaluating these internal structural properties rather than merely picking a single colour swatch from an aesthetic menu.
Facial Aesthetics, Sclera Brightness, and Complexion Undertones
A harmonious smile cannot be designed in isolation from the patient's surrounding facial framework. A fundamental benchmark in cosmetic smile design is the colour and value of the patient's sclera (the white of the eyes). Clinical prosthodontic guidelines suggest that the lightness of the central incisors should not noticeably exceed the brightness of the sclera. Selecting a shade significantly brighter than the eyes creates an artificial focal point, drawing visual attention away from the eyes and destabilising facial balance.
Skin undertone plays an equally critical role when learning how to choose veneer tooth shade for different complexions. Complexions generally divide into warm (yellow, peach, or golden undertones), cool (pink, red, or bluish undertones), and neutral profiles. Warm complexions harmonise best with dental shades containing reddish-yellow or subtle honey undertones (such as VITA A or B shades), which prevent the teeth from appearing grey or washed out. Conversely, cool complexions blend seamlessly with neutral-to-soft white shades containing minimal yellow chroma (such as VITA 1M1 or B1), which maintain brightness without clashing with the patient's natural dermal undertones.
Dermal contrast and regional patient characteristics must also be factored into clinical planning. Patients with deep melanin pigmentation often exhibit striking natural contrast, where a moderately bright, naturally warm tooth shade will appear substantially lighter against the lips and skin without requiring unphysiologically opaque bleach shades. Furthermore, age-related tissue changes—such as thinning lips, loss of vermilion border volume, and natural dental wear—alter how much tooth structure is displayed at rest and in animated function, influencing how light reflects across the dental arch.
Clinical Diagnostic Protocols for Shade Matching
Accurate shade analysis requires rigorous clinical diagnostics performed under controlled conditions. Ambient lighting is a primary source of clinical error; dental operatory lights and standard incandescent bulbs distort colour perception through irregular colour rendering indices. Dentists utilise specialised daylight-corrected illumination (calibrated to 5,500 Kelvin, the CIE standard illuminant D65) to assess teeth under neutral daylight conditions. Furthermore, shade evaluation must occur within the first two minutes of the consultation before eye fatigue sets in and the retina's cone photoreceptors become desensitised to red and yellow spectrums.
Teeth must be assessed while fully hydrated. When enamel is isolated and exposed to air during clinical procedures, it rapidly desiccates within 30 to 60 seconds, losing its translucency and appearing falsely chalky and bright. A systematic diagnostic workflow also incorporates digital photography utilising cross-polarisation filters. Cross-polarised photographs eliminate surface glare and specular reflections from the enamel, allowing the dental technician to clearly visualise deep dentinal staining, fluorosis patterns, and internal mamelon anatomy.
Advanced diagnostic toolsets combine visual analysis with electronic spectrophotometry and colorimetry. Clinical spectrophotometers measure the precise spectral reflectance of the tooth surface across multiple wavelengths, generating objective numerical data across the CIE L*a*b* colour space (lightness, red-green axis, and yellow-blue axis). This objective measurement minimises operator subjectivity and allows precise digital communication with the dental laboratory, ensuring that the final ceramic build-up matches the planned cosmetic outcome.
Colour Science and Clinical Shade Guide Classifications
In restorative dentistry, colour is broken down using the Munsell colour order system into three distinct coordinates: hue, value, and chroma. Hue represents the basic colour family (such as red-yellow or grey); chroma denotes the saturation or intensity of that hue; and value measures the relative lightness or brightness on a scale from pure black to pure white. Value is universally recognised as the most critical parameter in shade selection because human vision is far more sensitive to discrepancies in brightness than minor shifts in colour tone.
The historical standard for dental shade communication is the VITA Classical shade guide, which categorises teeth into four hue groups: A (reddish-brownish), B (reddish-yellowish), C (greyish), and D (reddish-grey). Within these groups, numbers 1 through 4 denote increasing chroma and decreasing value. However, the VITA 3D-Master system offers a more scientifically systematic approach by first establishing the correct value (ranked from 1, the lightest, to 5, the darkest), followed by the chroma and hue. This structured hierarchy prevents the common clinical error of selecting a restoration that is correct in colour but excessively bright or dark.
Modern aesthetic dentistry has expanded these classifications to include bleached shades (commonly designated 0M1, 0M2, 0M3 or BL1 through BL4). These shades lie outside the chromatic boundaries of the natural human dentition, presenting exceptionally high value and near-zero chroma. While high-value bleach shades are frequently requested, clinicians must exercise caution. Selecting extreme bleach shades without adequate ceramic translucency can result in a monochromatic, plastic-like restoration that lacks anatomical realism and draws unnatural contrast against natural facial tissues.
Underlying Substrate Shades and Ceramic Material Selection
A critical determinant of final veneer aesthetics is the colour of the underlying natural tooth, termed the preparation or substrate shade (often recorded using the VITA ND natural die shade guide). Because porcelain veneers are thin—frequently measuring between 0.3 mm and 0.7 mm in thickness—the underlying tooth structure transmits light directly through the ceramic restoration. If a clinician prepares a tooth exhibiting severe tetracycline banding, endodontic discolouration, or endemic fluorosis, that dark substrate will show through translucent porcelain unless adequately masked.
Masking dark substrates requires a careful balance between preparation depth and material opacity. For severely discoloured teeth, the dental surgeon may select a medium- or high-opacity lithium disilicate ingot or use a layered zirconia coping. These materials scatter and block light from the dark dentine underneath. However, masking discolouration within ultra-conservative preparations remains challenging; each 0.2 mm increase in ceramic thickness provides an additional step in opacity, requiring sufficient tooth reduction to avoid creating bulky, overcontoured restorations that trap plaque at the gum margin.
In regions with endemic dental fluorosis or distinct dietary staining—such as deep staining from betel nut, paan, or tobacco consumption—the preparation shade may vary widely across adjacent teeth in the same arch. In these complex scenarios, the dental technician must create individualised ceramic recipes for each tooth. By varying the internal opacifiers and surface characterisation, the ceramist ensures that the final restorations emerge with identical external shades, despite disparate starting substrates.
Step-by-Step Clinical Shade Selection and Try-In Workflow
The clinical workflow for shade matching begins during the preliminary aesthetic consultation prior to any irreversible tooth preparation. The clinician discusses patient expectations, analyses facial aesthetics, and records baseline digital spectrophotometric data under natural lighting. Diagnostic impressions and digital intraoral scans are obtained to construct a diagnostic wax-up, which allows a temporary composite 'mock-up' to be placed directly over the patient's teeth. This step allows the patient to preview the proposed tooth proportions and baseline brightness in real time within their facial frame.
At the preparation appointment, the dentist precisely prepares the teeth according to the planned ceramic thickness, records the final preparation die shades, and fits highly aesthetic provisional veneers. These temporary restorations serve as a functional and aesthetic blueprint. Over the subsequent one to two weeks, the patient assesses the shade and shape during everyday speech, smiling, and varied ambient lighting, providing valuable feedback before the dental laboratory completes the definitive porcelain firing.
During the definitive insertion visit, the provisional restorations are carefully removed and the teeth are cleaned. The clinician evaluates the final veneers using water-soluble try-in pastes of varying optical values and warmths. Try-in pastes simulate the refractive index of the final resin luting cement, allowing both clinician and patient to confirm the shade match before irreversible adhesive bonding occurs. Once mutual approval is documented, the veneers undergo standard adhesive conditioning (hydrofluoric acid etching and silanisation) and are permanently bonded using light-cured resin cements.
Post-Placement Adaptation, Gum Response, and Functional Integration
Following definitive veneer cementation, a period of biological and psychological adaptation occurs. In the initial 48 to 72 hours, mild transient tooth sensitivity to thermal changes (hot and cold liquids) is common, resulting from microscopic fluid shifts within the dentinal tubules during bonding procedures. Gingival tissues around the margins may appear slightly inflamed or blanched from rubber dam isolation, matrix placement, and the meticulous removal of excess resin cement; this soft tissue inflammation typically resolves within one week under gentle oral hygiene.
Patients also experience neurosensory and visual adaptation. The mouth is exceptionally sensitive to microscopic changes, and even subtle modifications to the incisal edge position or palatal contours can temporarily alter speech patterns (such as 's' and 'th' sounds) or feel unfamiliar to the tongue. Visually, patients transitioning from heavily discoloured teeth to balanced restorations often perceive their new smile as intensely bright during the first few days, until their visual self-perception adapts to their updated appearance.
A planned review appointment is routinely scheduled one to two weeks post-cementation. During this assessment, the dentist checks gingival health, ensures all marginal resin flash has been polished away, and verifies occlusion (the bite) during both static clenching and dynamic chewing movements. Ensuring harmonious contact patterns is vital: unexpected aesthetic forces or premature occlusal contacts can trigger chip fractures in the porcelain or exacerbate periodontal ligament sensitivity.
Managing Aesthetic Mismatches and Restorative Complications
Aesthetic complications can arise if shade selection protocols are compromised. The most frequent optical failure is metamerism—a physical phenomenon where two colour samples appear identical under one light source (such as the dental clinic fluorescent lighting) but visibly diverge under another (such as natural sunlight or evening halogen bulbs). Metamerism occurs when the chemical formulations and spectral reflection curves of the restorative ceramic do not closely match the natural enamel, underscoring the necessity of evaluating shade under multi-source illumination.
Another complication involves resin cement shade drift over time. While modern light-cured resin cements exhibit high colour stability, dual-cured or self-curing cements contain tertiary aromatic amines that can oxidise over years, shifting the cement layer toward a darker, yellowish hue. This is particularly problematic in thin, highly translucent veneers. In cases where the final shade mismatch is clinically unacceptable post-bonding, the restoration cannot be modified chemically; the porcelain must be carefully sectioned and removed with specialised diamond burs, followed by re-preparation and fabrication of a new restoration.
Gingival margin complications can also compromise aesthetic outcomes. Subgingival preparation margins placed too close to the alveolar bone crest can violate the biological width (junctional epithelium and connective tissue attachment), causing chronic gingivitis, pocket formation, or unpredictable gum recession. When the gum recedes, the junction between the veneer and the root surface becomes visible, exposing darker root dentine and creating an unsightly dark marginal line.
Evidence and further reading
The principles governing aesthetic dental restoration, biomimetic shade matching, and adhesive technology are extensively documented across peer-reviewed restorative literature. Landmark positions published by the American Dental Association (ADA), the FDI World Dental Federation, and the European Federation of Periodontology consistently emphasise that aesthetic restorative treatments must prioritize biological preservation, periodontally sound margin placement, and rigorous occlusal planning over aggressive cosmetic intervention.
Systematic reviews in leading publications—including the *Journal of Esthetic and Restorative Dentistry*, the *Journal of Prosthetic Dentistry*, *Dental Materials*, and the *Cochrane Database of Systematic Reviews*—demonstrate that lithium disilicate and feldspathic veneers have ten-year survival rates exceeding 90% when bonded to enamel substrates. However, survival rates decline when preparations extend extensively into deep dentine. Clinicians and researchers uniformly advocate for the integration of cross-polarised digital photography and clinical spectrophotometry alongside traditional shade tabs to eliminate subjective mismatch and achieve reliable, lifelike outcomes.
Urgent Symptoms and Post-Operative Red Flags
While elective veneer therapy has high clinical success rates, patients must recognise signs that require urgent clinical assessment. Immediate evaluation is warranted if a patient experiences spontaneous, throbbing dental pain, prolonged sensitivity to thermal stimuli that lingers for minutes, or nocturnal pain that disrupts sleep. These symptoms indicate irreversible pulpitis (severe inflammation of the dental pulp), which may occur if the tooth preparation approached the pulp chamber or generated excessive frictional heat during reduction.
Mechanical emergencies also demand prompt intervention. If a veneer becomes loose, partially debonds, or fractures, the exposed prepared dentine is vulnerable to rapid bacterial invasion and chemical sensitivity. The patient should avoid chewing on that side, keep the fractured fragment hydrated if intact, and contact their dental practice immediately. Patients must never attempt to reattach a dislodged porcelain veneer at home using commercial glues or non-medical adhesives, as this permanently damages the ceramic and underlying tooth tissue.
Periodontal and occlusal red flags include persistent bleeding, purulent discharge (pus) along the gum margin, or a sensation that the treated tooth strikes before other teeth when closing the jaw. A premature occlusal contact causes primary occlusal trauma, which can rapidly lead to tooth mobility, ceramic fracture, or joint pain in the temporomandibular complex. Prompt clinical intervention allows the clinician to adjust high contact points or manage soft tissue complications before permanent damage occurs.
Long-Term Preservation, Oral Habits, and Dietary Staining Risks
Glazed porcelain is an exceptionally dense, non-porous ceramic that resists intrinsic staining from dietary chromogens far better than composite resin or natural tooth enamel. However, the resin cement seam at the margin remains vulnerable to extrinsic staining over time. Frequent consumption of heavily pigmented foods and beverages—such as black tea, espresso, red wine, and turmeric-rich curries—can stain this microscopic margin if plaque control is sub-optimal.
Specific oral habits present severe hazards to both the aesthetic longevity and mechanical integrity of porcelain veneers. The use of smokeless tobacco, gutka, paan (betel leaf with areca nut and slaked lime), and supari introduces intense chemical chromogens that can deeply stain tooth-restoration interfaces and cause rapid, irreversible periodontal destruction. Additionally, areca nut chewing introduces heavy abrasive masticatory forces that drastically increase the risk of ceramic chipping, marginal fracturing, and catastrophic restoration debonding.
Long-term maintenance requires tailored oral hygiene protocols. Patients must use low-abrasivity fluoride toothpastes; abrasive whitening toothpastes containing coarse calcium carbonate or silica particles will micro-scratch the ceramic glaze, leading to loss of surface lustre and increased plaque retention. Dental hygienists must avoid using standard ultrasonic scaler tips directly on porcelain margins and should employ non-abrasive glycine or erythritol air-polishing powders instead of coarse sodium bicarbonate slurries during routine supportive periodontal therapy.
Questions patients ask us
- How do I choose the right veneer tooth shade for my skin tone?
- Choosing the right shade requires matching natural dermal undertones and facial contrast. Warm complexions (golden, yellow, olive) harmonise best with natural reddish-yellow tooth shades (VITA A or B groups). Cool complexions (pink, bluish undertones) look most natural with neutral, soft-white shades (VITA 1M1 or B1). A clinical rule of thumb is that the teeth should not be brighter than the white of your eyes (the sclera).
- Can porcelain veneers be made too white?
- Yes. Selecting high-value 'bleach shades' without adequate ceramic translucency can result in a flat, chalky, monochromatic appearance that looks artificial. Natural teeth possess internal colour gradients, light-reflecting translucency, and warm cervical tones. Restorations that lack these optical characteristics stand out unnaturally against facial features and lips.
- Will my porcelain veneers stain or change colour over time?
- Porcelain is non-porous and highly resistant to staining from coffee, tea, and red wine. However, the microscopic resin cement line bonding the veneer to the tooth can absorb stains over time if exposed to heavy dietary chromogens, smoking, paan, or gutka. Maintaining excellent oral hygiene and attending regular professional non-abrasive cleanings prevents marginal staining.
- How does a dentist determine what veneer shade to use?
- Dentists use calibrated daylight lamps (5,500K), standardized shade guides (such as VITA Classical or 3D-Master), digital intraoral spectrophotometers, and cross-polarised clinical photography. They also assess the underlying tooth (stump shade), facial complexion, and sclera brightness, subsequently verifying the choice with temporary mock-ups and try-in pastes.
- Can I change the colour of my veneers after they are bonded?
- No. Once a porcelain veneer is bonded with permanent resin cement, its colour cannot be modified chemically or lightened with dental bleaching products. If the final shade is unacceptable after permanent cementation, the veneer must be carefully ground off by a dentist and completely remade.
- What should I do if my underlying teeth are severely dark or stained?
- Dark underlying teeth, such as those caused by tetracycline staining or root canal treatment, require opaque ceramic materials like high-strength lithium disilicate or layered zirconia. Your dentist must record the 'die shade' of the prepared tooth so the laboratory technician can incorporate opacifying layers to block out the darkness.
- Does getting porcelain veneers cause permanent sensitivity?
- Mild thermal sensitivity to cold and hot liquids is common for a few days up to several weeks following preparation and cementation. However, permanent sensitivity is abnormal. If severe, lingering, or throbbing pain occurs, it may indicate pulpal inflammation, which requires urgent clinical assessment.
- How can I preview the shade before my veneers are permanently placed?
- Dentists provide previews through direct resin mock-ups and temporary acrylic veneers that you wear for several weeks. During the definitive placement visit, your dentist will place the final veneers on your teeth using water-soluble try-in pastes, allowing you to review and confirm the colour in natural light before permanent bonding.
Sources and further reading
Guidance from professional and public health bodies. Clinical decisions here are made on your own examination and radiographs.
- 1.Whitening, bonding and veneers — patient information — American Dental Association
- 2.Guidance on tooth whitening and cosmetic dental treatment — British Dental Association
- 3.Oral health — fact sheet and global status report — World Health Organization
- 4.Policy statements and oral health definitions — FDI World Dental Federation
- 5.Dental health — conditions, treatments and patient guidance — NHS (UK)
- 6.Systematic reviews of oral and dental interventions — Cochrane Oral Health
- 7.Regulatory framework and dental education standards in India — Dental Council of India
When to see us
Get examined without waiting if any of the following applies to you:
- Sensitivity or pain that continues for more than a few days after cosmetic work
- A veneer, crown or bonded restoration that has chipped, debonded or feels high in the bite
- Gum inflammation or dark margins developing at the edge of a restoration
Get a written plan and cost before you commit
If this is what you are dealing with, the next step is a consultation with radiographs — cosmetic & smile design cases are seen by the specialist who handles that field. You get a written plan and staged cost before anything begins.
reception@dramitsharmahospital.comThis article is general education and does not replace an in-person examination, radiographs or a diagnosis by a qualified dentist.
Clinical terms in this article
Related in Cosmetic & Smile Design
Dental Crowns and Bridges: What They Are and When You Need One
How crowns and bridges restore damaged or missing teeth, the materials used, and what the process and aftercare involve.
Teeth Whitening and Tooth Stains: Causes and Treatment Options
Why teeth discolour over time, the difference between surface stains and deeper discolouration, and how professional whitening compares with home options.
Smile Makeover and Digital Smile Design
How veneers, bonding, whitening and gum contouring are combined into one planned cosmetic outcome.
Teeth Whitening: What Actually Works
In-office versus home whitening, realistic expectations, sensitivity management and what whitening cannot fix.
Black Triangles Between Teeth Causes and Treatment
Open gingival embrasures, commonly called black triangles between teeth and gums, occur when the interdental papilla recedes. Explore the anatomical causes, clinical classifications, restorative and orthodontic treatments, and long-term periodontal maintenance strategies.
Internal Tooth Bleaching for Discolored Nonvital Teeth
Internal tooth bleaching after root canal treatment is a conservative endodontic procedure that lightens intrinsically discoloured, non-vital teeth from within the pulp chamber, restoring natural aesthetics without requiring extensive structural removal for crowns or veneers.